
Getting Started
Domains
How Menus work
Video coming soon...
Creating a Menu
- Open your sites Admin Area, and Login
- Navigate to Pages -> Menus
- Click 'New Menu'
- Name the Menu
- Attach sub-pages, categories, or products to be listed on your menu.
Linking to Menus
Put Page/Category/Product/News/Blog on Menu
- Navigate to Page to add to menu, and open.
- In the linked items area, click Add -> Menu
- Select the menu you want the page to show up on.
- Your item is now on the menu. You can change the position by altering the items Sort Order property.
NOTE:
Links added to menu open a new window by default. If you want to stay in the same window, once they are clicked, You need to go to link module and change the target from '_blank' to '_self'
Sub-Menus
Understanding Sub-Menus Types
This is two different ways to create sub-menus in Udo, depending on your needs. The first is to use a page as the branch point, this means users can visit the menu, and the sub menu items, as distinct pages. The alternative way is to attach a menu and a sub-menu, with pages attached to the sub-menu, this prevents the menu item from having its own dedicated page.
Example:
Main Menu (menu)
- Home (page)
- Products (page)
- Category A (category)
- Categeory B (category)
- About Us (menu)
- Company Profile (page)
- Our Services (page)
- Why Choose Us. (page)
- Contact Us (page)
In the above example visitors are able to see your Product landing area, to help the customer decide which category they want. However visitors are automatically directed to Company Profile when someone tries to visit the About Us menu link, because it is not a page.
Adding a Sub-Menu
- Navigate to Menu who are adding a sub-menu to.
- In the linked items area, click Create -> Sub-Menu
- Enter a name for the submenu.
- Add your pages to the sub-menu using Add -> Sub-Page.
- On the Sub menu click 'Go Live' to save your changes.
- You have added as sub-menu with child menu items. You can change the position by altering the items Sort Order property.
Adding a Page, to another page as a sub-menu item
- Navigate to Page to add as sub-menu item, and open.
- In the linked items area, click Add -> Parent Page
- Select the page you want the page to show below in the menu.
- Your item is now add as a sub-menu item. You can change the position by altering the items Sort Order property.
Un-linking from Menus
Remove Page/Category/Product/News/Blog from Menu
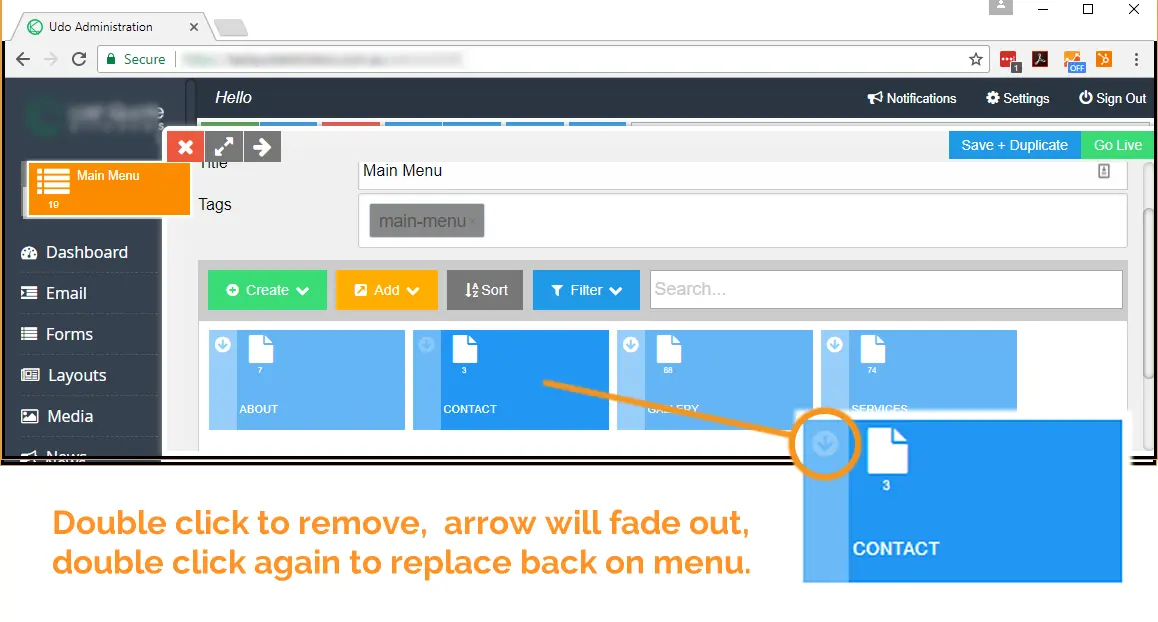
- In left hand menu under pages click on Menus to open the menus available.
- Choose the menu required to open (double click)
- In the linked items area, double click the down arrow next to the item you wish to remove.
- You will notice the arrow will fade out, this shows the item is now removed and will no longer show up on this menu. This item/card will remove itself once you close the window. Note: you can double click the arrow again while open and still visible to replace back on menu.
Displaying Menus
Creating a New Menu in a Layout
- Open the Layout you wish to add a menu into.
- Toggle 'Design Mode' on
- Drag the Menu block where you want it.
- Click 'Choose menu' on the block options toolbar.
- Select a menu from the list.
- Choose 'Horizontal' or 'Vertical' Layout for the menu
- If required change the alignment.
- Set the sub-level menu, if required.
- Select the menu font from Default (body font), Header or Secondary Menu Font. The menu fonts can be updated from Settings -> Theme Configuration